
How to Delete Old Boot Menu Options on Windows 10
Dual booting Windows 10 is useful, but can leave redundant boot options in the dual boot menu. Here’s how to remove them.
Have you ever dual-booted another operating system alongside your Windows installation? Dual-booting is an excellent way of trying a new operating system without affecting your trusty version of Windows. You can select between operating system versions using the built-in boot manager.
But what about when you decide you don’t want the second operating system any longer? Is there any easy way to remove the additional operating system entry from the boot manager to stop startup confusion?
Let’s take a look at four ways you can delete old boot menu options.
What Is the Windows Boot Manager?
The Windows Boot Manager is a tiny piece of software that runs during the system boot process.
Your boot manager code loads from the start of the Active system partition, sometimes given the System Reserved label so that you don’t accidentally overwrite it with cat selfies. The boot manager helps your Windows installation start. The Windows Boot Manager itself is generic and unaware of any operating system requirements within the system loading process.
When there is only one version of Windows present, the system will boot into this without displaying the boot manager selection screen. However, once you install another operating system, this process changes, allowing you to choose the operating system you want to use.
Boot Configuration Data
Modern Windows versions store Boot Configuration Data (BCD) in a registry-like database. Previously, you managed your boot screen options using the tiny boot.ini file (and Windows NT boot loader, ntldr). However, a single insecure text file is vulnerable to attack. Hence, this was changed to a more secure but universal solution.
Moreover, BCD provides both BIOS and EFI-based systems the same opportunities to edit configuration data using a boot option editing tool like BCDEdit (more on this in a moment).
Here are four ways to remove old boot manager options from your system boot process on Windows 10.
1. Hide the Options
Okay, so the first option isn’t strictly removing the entry, but you can hide the alternative boot options using the Windows Advanced startup menu.
- Press Windows Key + I to open the Settings panel.
- Head to Update & Security > Recovery, and under Advanced startup, select Restart now. (Alternatively, press Shift while selecting Restart in the Start menu.) Please note that this instantly restarts your system, so make sure to save any important documents before hitting the button.
- Select Use another operating system > Change defaults. Here you can set the Windows Boot Manager timer screen and Choose a default operating system. Selecting your default operating system doesn’t remove other installations, but it does stop the Boot Manager from appearing in each system startup.
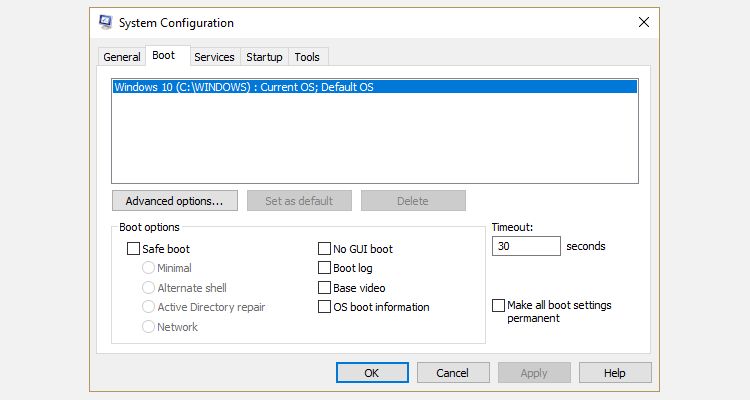
Alternative Method: Use MSConfig
You can achieve similar results using the Windows System Configuration window.
- Type msconfig in the Start menu search bar and select the Best Match.
- Open the Boot tab.
- You can set your default operating system, the timeout screen, and other boot options.
Furthermore, you can “delete” old entries from the boot process, but this doesn’t actually remove them from your system (it does stop the boot manager operating system selection screen from appearing, though).
2. Use BCDEdit to Remove Boot Manager Options
BCDEdit is the built-in boot manager editing tool. A word of warning: deleting the wrong boot manager entry has very frustrating results. Double-check every edit before hitting Enter.
- Type cmd in the Start menu search bar, right-click Command Prompt and select Run as administrator.
- Once the elevated Command Prompt window opens, type bcdedit /export c:\bcdbackup and press Enter to create a backup of your BCD settings.
- Next, type bcdedit /v to list the boot loaders currently on your system. Here’s what happens when I run this command on my desktop:
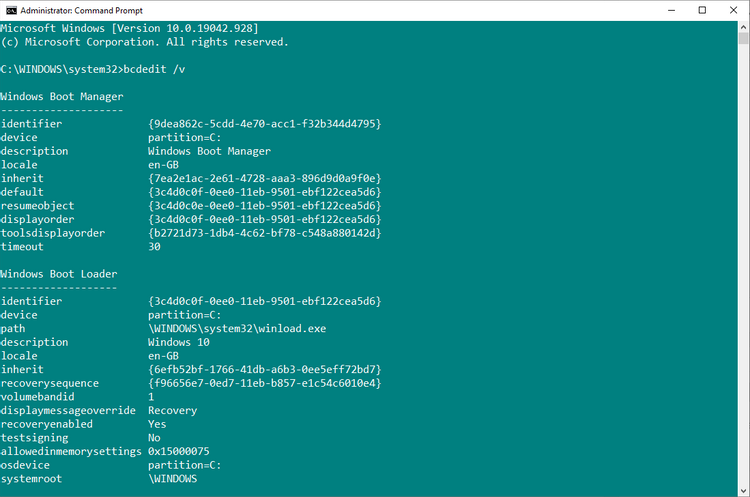
The Windows Boot Manager section describes the location of the boot manager, along with other identifiers. The Windows Boot Loader section describes the Windows 10 bootloader for this system, the unique identifier, where to find winload.exe to continue the boot process, if the partition has recovery enabled, and the root of the system directory.
If you have more than one Windows installation, this is where to find the bootloader information. The type of operating system appears alongside description. Furthermore, a Legacy OS Loader will appear under a separate bracket.
Copy the identifier (the long alphanumeric string) of the bootloader you want to delete. Now, input the command bcdedit /delete {identifier}, swapping out identifier for your own alphanumeric string.
Double-check you have the correct entry, then press Enter to delete the additional bootloader entry. The integrated BCD Editor is one of the quickest ways to remove a boot option from your BIOS, but it isn’t for everyone.
Source : https://www.makeuseof.com/tag/delete-boot-menu-options-windows/