
Set up Windows to Auto Login to Domain Account
How to Set up Windows to Auto Login to Domain Account?
- Press the Windows key + R to bring up the Run box. Type regedit and hit Enter.
- When the Registry Editor opens, navigate to the following registry location:
HKEY_LOCAL_MACHINE\SOFTWARE\Microsoft\Windows NT\CurrentVersion\Winlogon - In the right pane, you need to modify or create each of these registry entries:
DefaultUserName,DefaultPassword,DefaultDomainName,AutoAdminLogon. If any of these keys are missing, create a new String Value (REG_SZ). - Double-click the
DefaultUserNameentry, type the user name to log on with, and then click OK. - Double-click the
DefaultPasswordentry, type the password for the user account under the value data box, and then click OK. - Double-click on
DefaultDomainName, and specify the domain name of the user account. If it’s local user, specify local host name. - Double-click the
AutoAdminLogonentry, setAutoAdminLogonto 1 to enable the auto logon. IfAutoLogonCountorAutoLogonCheckedexists, delete it.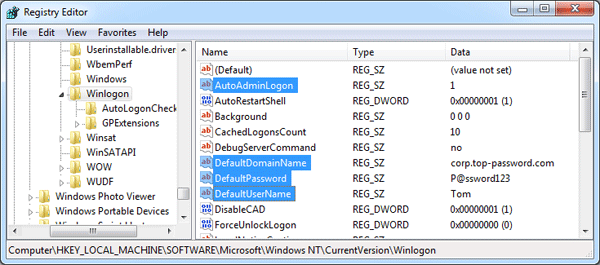
Once those four options are created and altered, you’re good to reboot and from now on every time you start Windows it will automatically login to your specified domain account! Again, if for some reason the auto-logon doesn’t work, go back into the registry and double-check the four entries in that folder to make sure nothing’s out of place.